Learning to use flash for food photography can be challenging but very rewarding. After a couple of years of shooting in natural light, I made the switch to flash when I knew I wanted to work commercially with clients.
I’ve never looked back.
Now I’d say I use flash for about 90% of my work. For the other 10%, I use continuous lighting. It’s very rare that I use natural light at all. I just love the control that shooting with artificial light gives me.
Here are my top tips to know when working with flash in food photography.

Flash Behaves Differently Than Natural Light
I hear a lot of teachers in the online space talk about how “light is light”, as if there is no difference between using natural light and flash.
Yes, the principles of light are applicable to different forms of lighting in photography. If you understand the Inverse Square Law and how light falls off, or how the distance and size of your light source affects your shadows, you can make certain predictions about how your image will look.
Yet flash behaves differently than natural light. Natural light falls off at a slower rate than artificial light because the light source (the sun) is so far away. Flash is an explosion of light, which needs to be managed in order for you to get the effect you want. Ironically, in food photography, this is usually a natural light look.
The foundation of working with flash is to understand that even though the same principles of physics apply, flash behaves differently than natural light.
Shutter Speed Doesn’t Matter Much
One of the most fundamental differences in shooting with flash versus working in natural light is the exposure triangle. When photographing with natural light, shutter speed has a big influence on exposure. With flash, aperture and the power emitted from your flash unit control the exposure. Shutter speed doesn’t actually matter that much.
When working with flash, you need to be shooting at a shutter speed that is within a certain range in order to cancel out ambient light. If you go higher than this range, you’ll exceed the “sync speed” of your camera. This will result in a black band across your images. This is your shutter visibly opening and closing in your shot.
Each camera has a sync speed. Canon is typically 1/200th of a second, while Nikon is usually 1/250th of a second. Note that this can vary from camera to camera. I shoot with a Canon, but the maximum sync speed for my camera is actually 1/160th.
There is also a point when you go low with your shutter speed that you’ll be letting ambient light in. This is useful if you want to mix daylight with flash, but in general, my shutter speed is always set to my camera’s sync speed.

Everything is Reflective
Another important principle in photography is that everything is reflective.
Yes, your glassware and cutlery are reflective. They are the bane of every food photographer’s existence. But everything else you photograph is reflective as well. Every object reflects and absorbs a certain amount of light–some more than others. Reflection is light striking an object and bouncing off. This reflection can be considered diffuse, direct, or a glare.
Once you have progressed in your food photography, you can study these important principles of physics and how they affect your results. The important thing to know right now is that if everything reflects and absorbs light differently, then your results can vary wildly, depending on what you’re photographing.
What this means that you and I can have the exact same lighting set-up, but can get drastically different images depending on the color and material of the background and props, the material and size of the subject, and even the color of the floor and walls.
This is why lighting diagrams are useful, yet don’t teach you much about achieving a great image.
Cross Shadows Can Happen
In food photography, you can often get away with using one light–especially if you’re shooting editorial. Reflectors and bounce cards are often enough to kick some fill into the shadows in order to make a dynamic image.
When you add a second light, you can get into problems by unintentionally creating cross shadows. This typically happens when you turn up the power of your second light. The second light is a fill light. The main light is your key light. The fill light should be at a lower power than the key light. Starting at about 1/2 the power of the key light is a good rule of thumb, but it will really depend on the lighting set-up and what you’re shooting.
If you’re shooting with two lights, work with the fill light first, so you can observe what it’s doing. After that, add the key light and make adjustment from there.
Cross shadows will make your work look amateurish and unnatural. After all, there is only one sun.
Move Your Light Source
When using flash, you can greatly manipulate your results by moving your light source. There are other factors that play a part in the appearance of your exposure, in the look of your highlights and shadows, but the distance of your light source is key.
The sun is massive but it’s considered a small light source because it’s millions of miles away. Without the diffusion of clouds, it emits hard light. You can observe this in the hard shadows you see around you on a sunny day. Clouds increase the effective size of light. This is the size of the light source in relation to the subject.
The principle is that a small light source produces hard-edged shadows, while a large light source produces soft-edged shadows. When moving your light further from your subject, you increase contrast by reducing the range of angles from which light rays can strike the subject. The closer we move the light source, the larger it becomes in relation to the subject.
The interesting thing to note if you’re using flash in a studio setting is that moving the light further away will soften your shadows because more rays will be reflected into the shadows by the surrounding walls.
Your Modifier Matters
So we’ve just seen that in general, a small light source produces hard-edged shadows, but you can influence the effective size of your light with diffusers, umbrellas, bounce cards etc.
My favourite one light set-up requires a reflector fitted with a honeycomb grid and positioned about 1-meter– or 40 inches away–from a very large diffuser, as pictured in the diagram below.
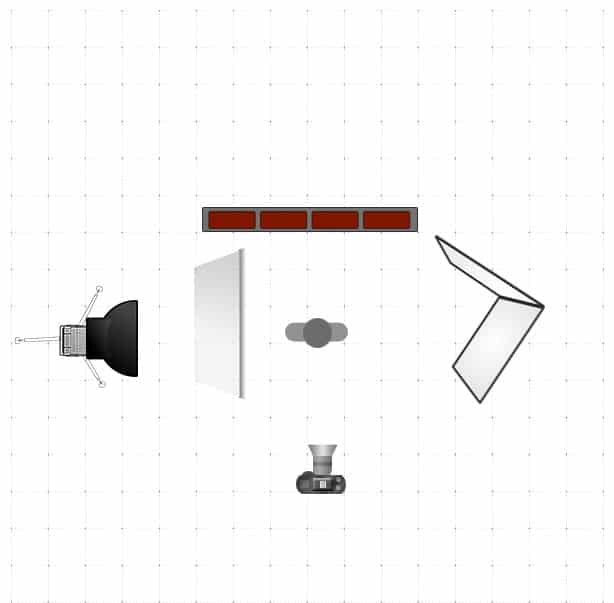
How far I position it away from the diffuser depends on how much the light spreads across the diffuser and the way it falls onto my scene. Typically I’m at about 1-meter away, but it can be more, or it can be less.
When you pull the light source back, the spread of light across the diffuser will be wider, giving you softer, more diffused light, increasing its effective size. I like this modifier for my editorial work because it gives me beautiful contrast. The honeycomb grid focuses the beam of light and controls spill. The extra large diffuser will also prevent light spill.
There are pros and cons to every modifier. Your choice of modifier should be based on what you’re trying to achieve with your lighting and serve to manipulate your results.
Conclusion
There is a lot to learn when it comes to flash photography, but if you are well-versed in natural light, it can help you in your learning curve.
Hopefully these tips will give you a head start on your journey into the wonderful world of flash for food photography.






2 Responses
You are awesome!
Aww thanks so much, Annelien. <3