A while back, I wrote this post about switching from Lightroom to Capture One.
Making this move is not right for everyone. Your choice of RAW editor can depend on a lot of things, such as your workflow preferences, the way you want your photos to look, and the end use of your images.
Capture One was developed by Phase One, a Danish manufacturer of medium format cameras. Thus, the software has always focused on tools and workflow for studio use, and this is where it really excels.
It doesn’t have as many features as Lightroom, but the tools and features it does have are more robust and highly customizable. Coupled with renowned tethering performance and powerful colour engine, Capture One is an excellent solution for food and other still life photographers.
If you’re nervous about the learning curve associated with yet another piece of software, don’t worry – knowing Lightroom will give you a great foundation for learning Capture One. Although the program is more complex, you can get up-and-running quickly without knowing the ins- and-out of every single tool.
Here are ten tips to help make the transition from Lightroom to Capture One.
1. Importing your Lightroom Catalog
When you click on the Catalog dropdown menu in Capture One, you’ll see that you can that you can actually migrate your Lightroom catalog directly into Capture One!
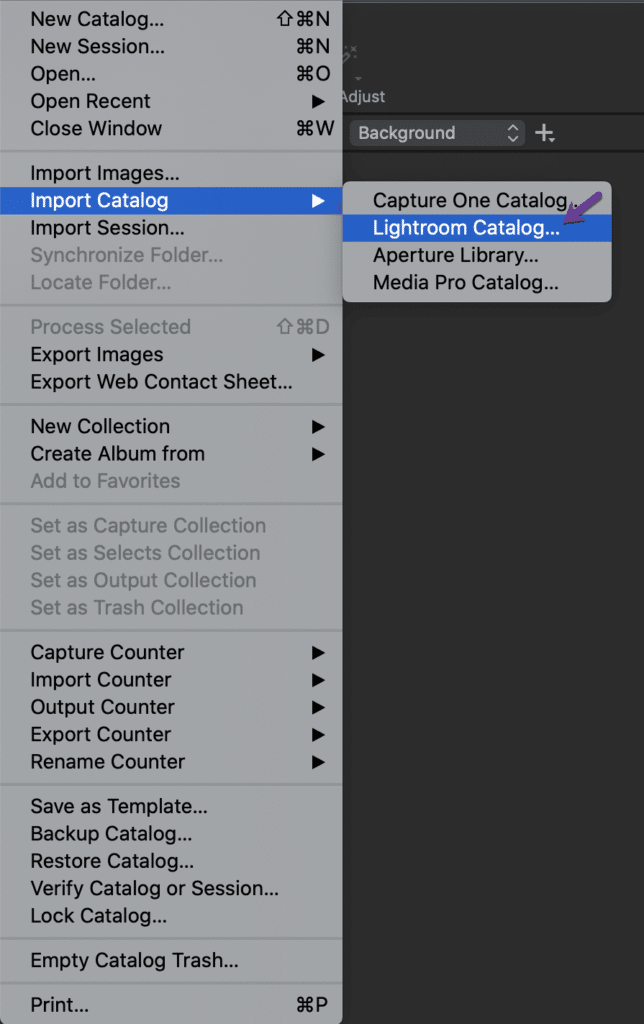
It’s a simple process that involves only a few quick steps, and is a great nudge to make the switch.
Migrating will not have an impact on your Lightroom catalog, and you can continue to use it as you normally would.
Although I’m primarily a Capture One user, I still use Lightroom from time to time for certain types of shoots. I love the flexibility that utilizing both programs gives me.
One thing to note is that while edits such as Exposure, Highlights, Shadows, White Balance and Rotation will be imported seamlessly, every single adjustment might not translate. This can be the case with some color settings, for example.
For a step-by-step guide on how to migrate your Lightroom Catalog into COP, check out this article on the Capture One website.
2. Familiarize Yourself with the Capture One Interface
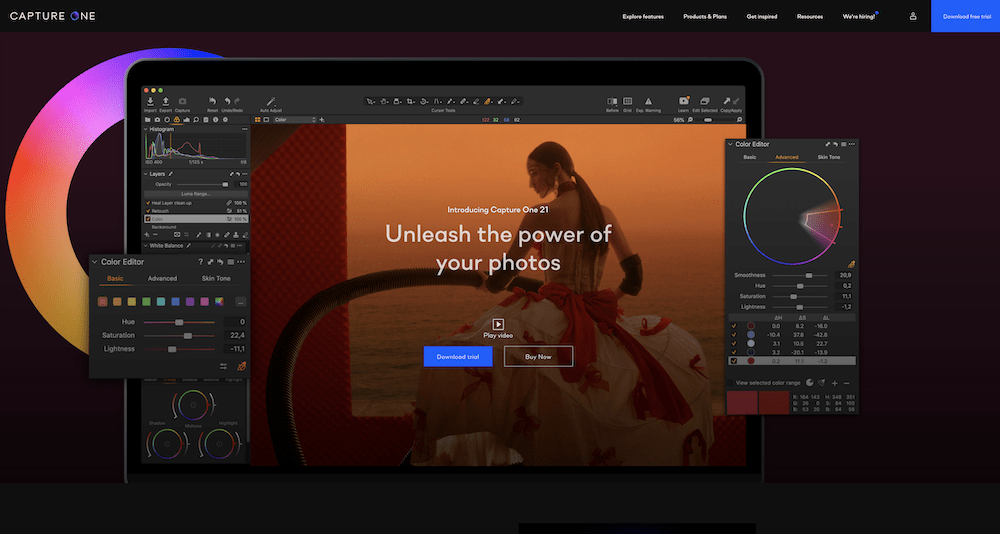
If you compare the interfaces of Lightroom and Capture One Pro, you’ll immediately notice a big difference.
While Lightroom has separate tabs for the various workspaces such as the Library and Develop modules, Capture One has an all-in-one workspace.
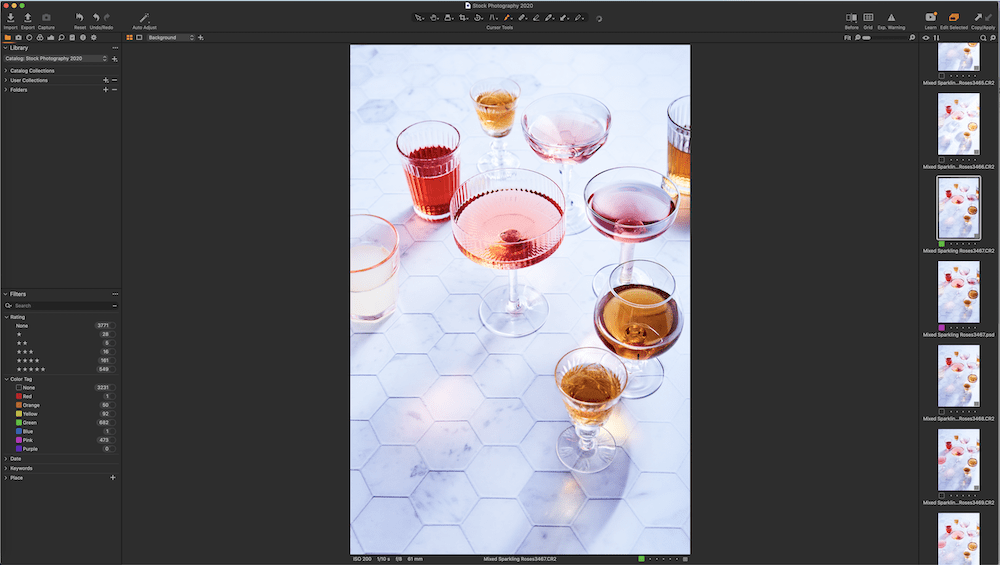
Instead of jumping around from module to module for specific functions, all of the tools in Capture One (COP) are at your fingertips and are highly customizable.
The various panels in COP are called Tools. They are organized under various Tabs.
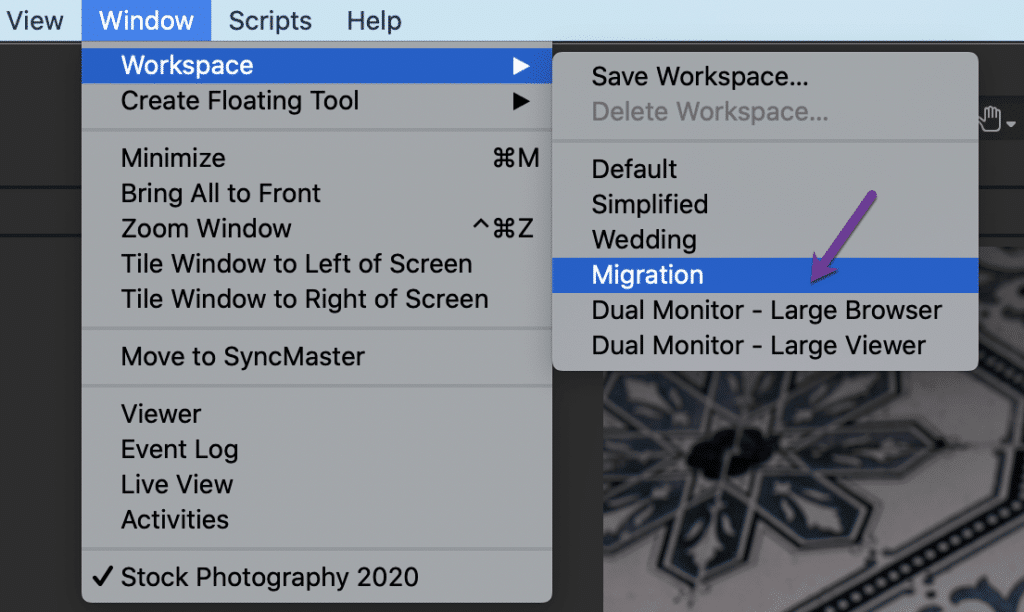
The interface is so customizable that you can even mimic the Lightroom workspace until you familiarize yourself with the program and decide how you want your workspace to look.
To do this, simply go to Window->Workspace->Migration.
3. Customize your Tools
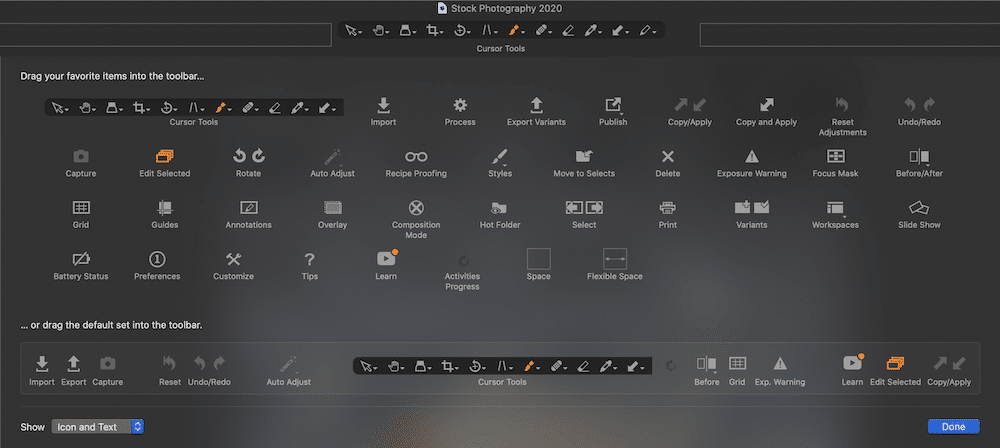
The key to getting the most out of Capture One’s awesome functionality is to customize your tools. The tools in COP are highly customizable, which is another bonus to making the switch from Lightroom.
You can move the tools around and you can set up a Tab containing only the tools you regularly use.
For example, you can move your White Balance Tool to the Exposure panel, similar to how it’s set up in Lightroom.
Right-click on the Tab to add a tool or remove it. You can also float your tools by dragging them onto the image itself.
4. Catalogs and Sessions
Capture One offers two management systems: Catalogs and Sessions. Both have their pros and cons.
As far as organization goes, a COP Catalog is similar to a Lightroom Catalog. Think of Sessions as being similar to Lightroom Collections, but with additional functionality.
Catalogs are most suitable for organizing large volumes of images, whereas Sessions are typically used for individual shoots. Performance will top out at around 3K images in a given Session.
Sessions provide a simple, folder-based workflow. They provide you with the ability to browse any folder on your computer without having to import images. Your adjustments are placed in a subfolder next to the images.
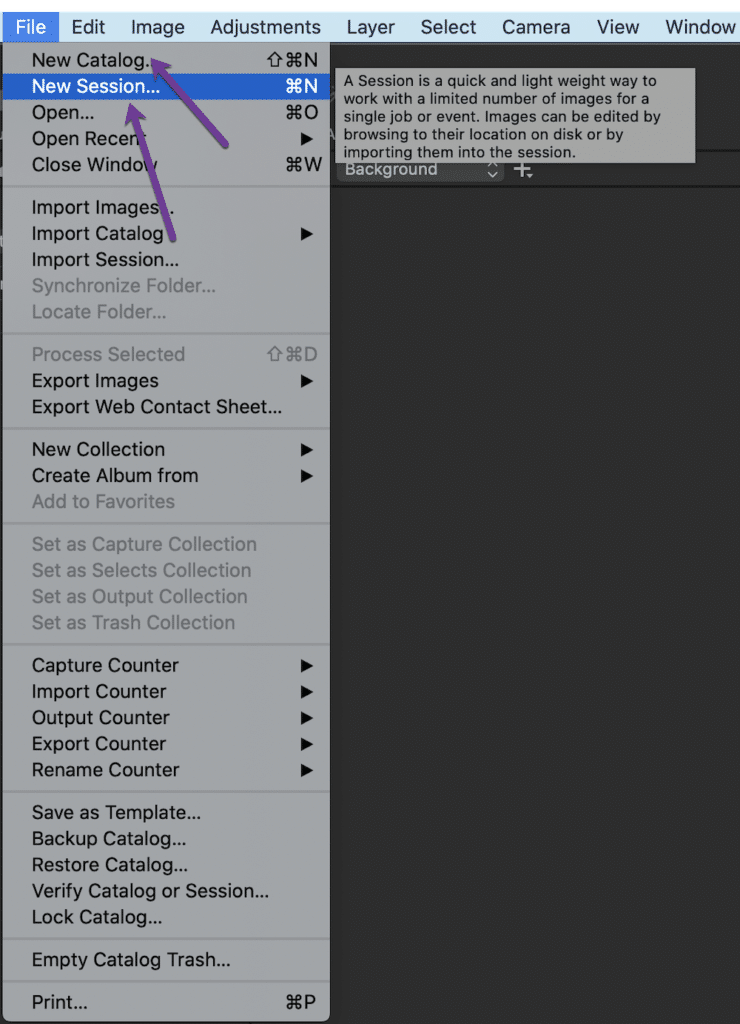
Sessions are great for on-set workflow and tethered shooting, and are generally seen as the most efficient option in these scenarios. Sessions allow you to store all the files from a single project together.
Once you have migrated your Lightroom Catalog into COP, you can build and structure your photos into Sessions if you choose.
When you create a new Session, Capture One creates five folders on your hard drive. It creates a parent folder with the name of your session.
This folder contains the following:
Capture: contains the RAW files
Output: contains converted JPEGS, TIFFS, etc
Selects: images you’ve marked as a “select”
Trash: images you’ve deleted during capture
Any images that you delete during your COP session will go into Trash, but won’t be deleted from your disk until you physically delete them from this folder.
I use both Catalogs and Sessions in my workflow. You may prefer to have one master catalog, or create catalogs based on genre.
If you only shoot in one or two genres, you might want to separate commercial work from editorial work, stock photography, or personal photos, for example.
Create an organizational system that works for you.
5. Get to Know the Color Editor
Many photographers who make the switch from Lightroom to Capture One say that the color quality is unparalleled by any RAW editor out there–especially when it comes to natural-looking skin tones.
In fact, it has its own editor for skin tones, which come in handy for those chef portraits.
If you’re used to the HSL sliders in Lightroom, the color tools will feel very new to you, and may require some getting used to.
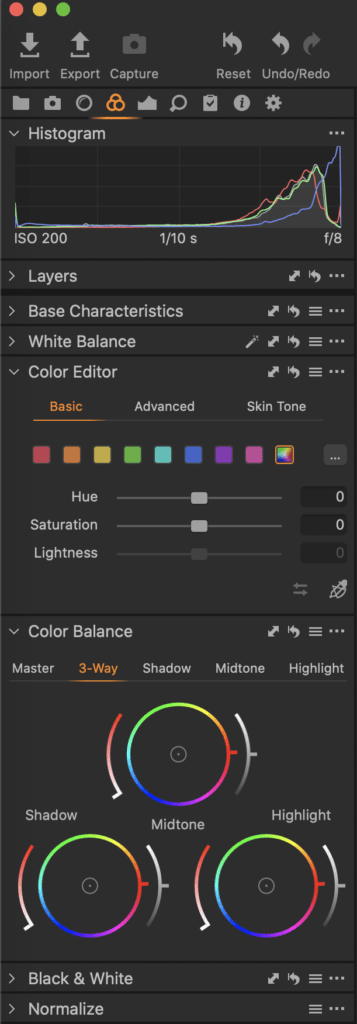
You can use the Color Editor with masks. It’s split into three tabs: Basic, Advanced, and Skin Tone.
The Basic Tab is divided into eight color ranges, represented by a color wheel, and one that encompasses the whole spectrum. Here you can use sliders that affect Hue, Saturation, and Lightness.
To work on a certain color, click on the Eyedropper Tool and then click on the color in your image you want to edit. Sliding vertically on the area will affect the Saturation. Sliding horizontally affects the Hue.
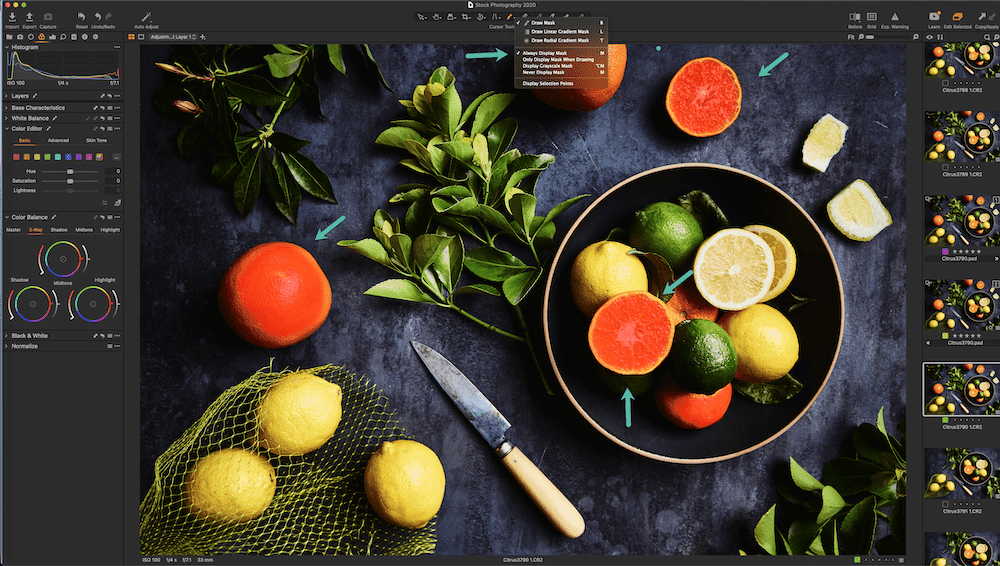
In my image below, I worked individually on the oranges without altering anything else. This comes in handy when you’re working on a photo with various hues of the same color, by helping you target only those colors you want to alter.
6. Practice Working with Layers
One of the best features that Capture One Pro has to offer is the ability to work in Layers.
These layers are similar to the layers in Photoshop, in that they work with masks, but function like targeted adjustments in Lightroom.
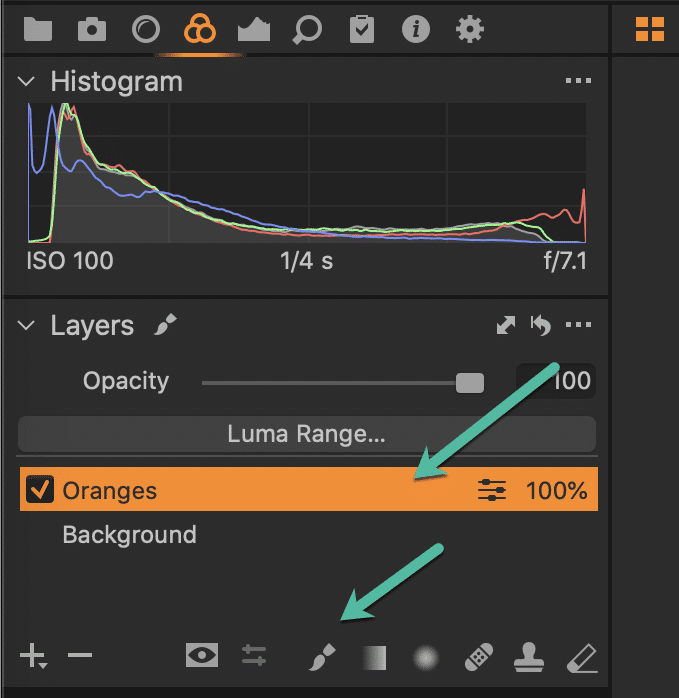
Masks determine where on the layer your adjustments will be applied. You can create masks in multiple ways. For example, you can brush them in, just like with the Adjustment Brush in Lightroom.
Click on the brush and paint over the area you want to work on. By default, the area will be indicated in red. It will only show up when you’re painting unless you hit the shortcut “M” to keep it on permanently.
You can use the shortcut key “E” to erase any areas that you want to subtract.
You can make changes to exposure, contrast, clarity, saturation etc.
Be sure to name each layer when working with multiple layers to keep track of the various edits you’ve made to your image.
To do this double-click on the Layer name and type in a new name.
7. Play around with Creating Styles
Are you used to working with presets in Lightroom? Capture One Pro offers the same capability – another reason not to hesitate about switching from Lightroom.
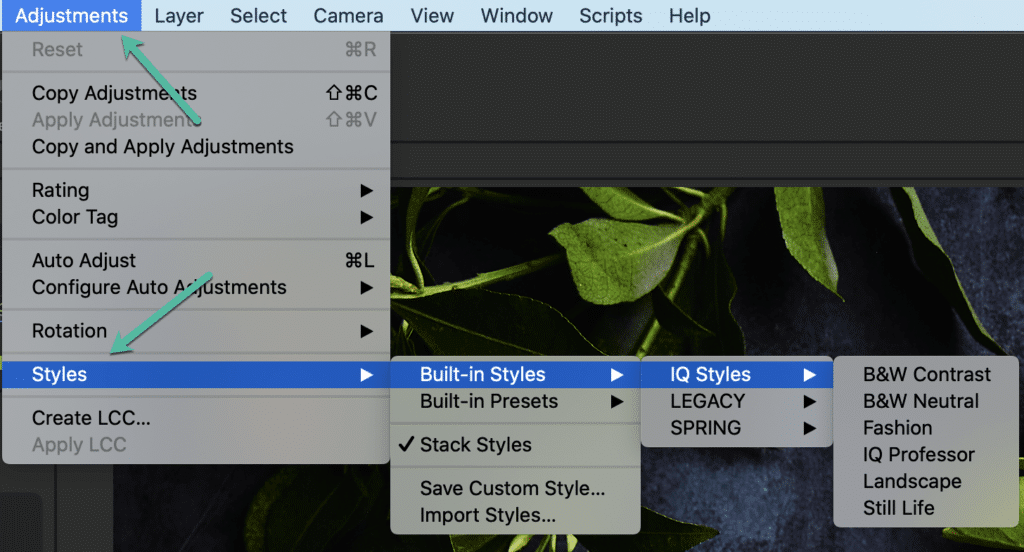
What you know as a Preset in Lightroom is called a Style in Capture One.
Capture One Pro also has “presets,” but they include only one Tool and are accessible from within that particular tool.
Styles contains several Tools to create a pre-determined look.
The same way you can purchase presets from various third-parties, you can also purchase Styles from Capture One Pro/Phase One.
Although I generally don’t recommend presets for food photography, they can be useful as a starting point, or good for editing in other genres you may be shooting.
To take a look at the Style packs Capture One offers, head over to this link.
8. Copy your adjustments
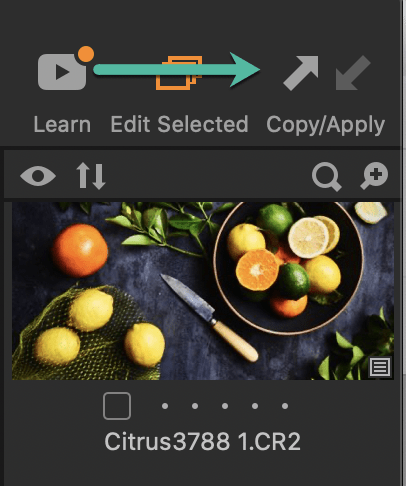
In Capture One, you can copy your adjustments from one image to another, just like you can in Lightroom.
Go to the upper-right-hand corner of the interface and click on the arrow up icon.
Click the arrow down icon to paste them to your images.
Syncing edits from one base photo to the others in a series is a great time-saver.
9. Try Process Recipes
Process Recipes are similar to Lightroom’s Export presets, but you can select several at one time. Once you set them up, they can make your workflow a lot quicker and more efficient. No more tinkering with dialog boxes!
Each recipe includes the output file format information and location information. There are also options for watermarking, metadata, and sharpening, etc.
You can create a specific process recipe for images that you want to export for social media use, with lower resolution and optimal pixel dimensions for social sharing.
Or you can create a recipe for printing your images for your portfolio, or for postcards to send as promotional pieces. You can even export multiple recipes at the same time by checking off their respective checkboxes.
You can find Process Recipes under the Output Tool Tab.
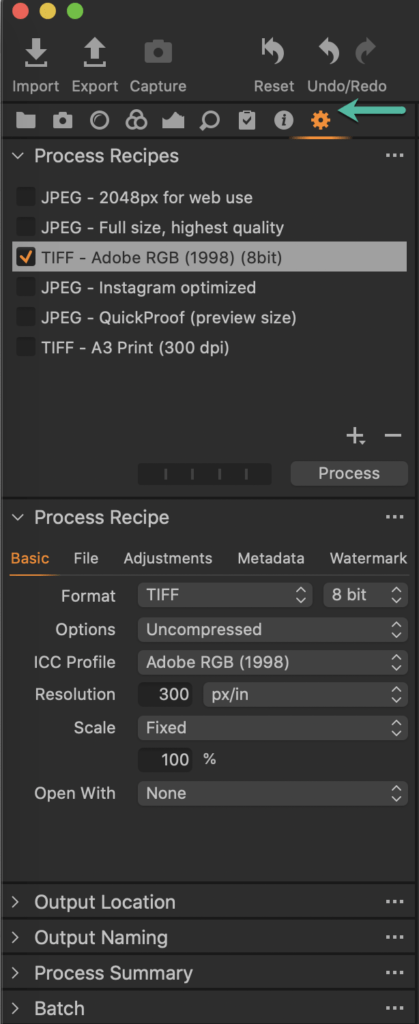
Note that COP has created some Process recipes to get you started.
To create a new Process Recipe, click on the arrow in the lower right- hand side of the panel. Rename it with any name you like – for example, “Instagram.”
It will give you all the options for exporting the photo, as seen in the Cirst picture, including the Output Location and Output Naming conventions.
10. Try Shooting Tethered
One of the best things about switching from Lightroom to Capture One Pro is the outstanding tethering performance.
Although Lightroom has improved its tethering capabilities in the last couple of years, it remains a bit buggy and has a tendency to crash. COP leads the way in tethering in the photographic industry with its instant tethered capture technology.
With tethered capture in Lightroom, your camera also goes to sleep when you’re not using it. This is a massive pain if you’re working in a
studio with a client. COP stays open as long as you keep the tethering session open.
You can also use Live View with Layout Overlays. This is really handy if you’re shooting a magazine cover or product packaging where you must work around the placement of text.
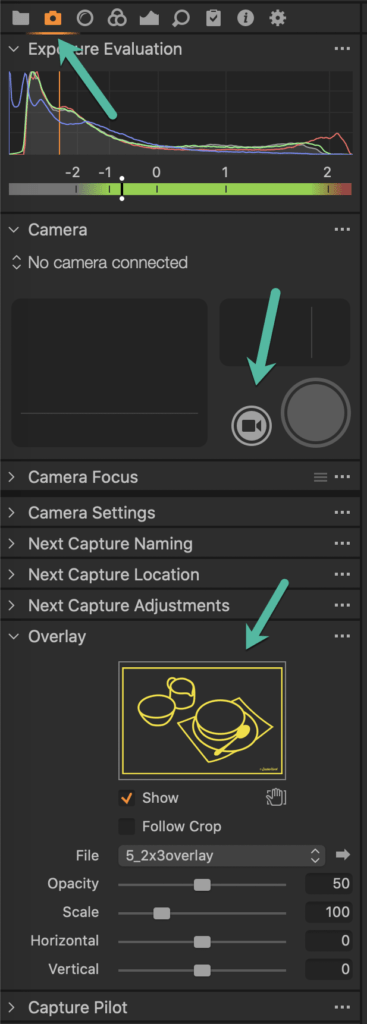
If you’re interested in upping your composition game with templates you can use as overlays in Capture One and Lightroom, click here for more info.

Conclusion
Hopefully, these tips have given you a better idea of how easy it is to make the switch from Lightroom to Capture One.
Only you can decide which RAW editor is for you. However, with its reputation for color quality, flexible workspace, and tons of ways to keep you organized and create an efficient workflow, Capture One is totally worth checking out.
You can click on this link to try a 30-day free trial to help you decide.
I’ll be speaking about Capture One Pro at this year’s annual Master the Art of Food Photography Summit, taking place from June 9-11. The summit features over 15 top food photographers and educators and the event is free to attend. There is also a VIP option for extra bonuses, replays and more. I hope to see you there!

I’m also working on a masterclass about Capture One for food photography, which will be available on June 24. Click here to get on the waiting list for updates and early bird pricing.


